Android Architecture From a Developer's Perspective
■ Android Architecture
■ Kernel
■ Native Libs and ART
■ App Framework
■ Applications
■ ROMs
■ Bootloader Unlocking
■ Rooting
■ Flashing
■ Bootloop, Soft Brick, Hard Brick
■ Fastboot
■ Android Debug Bridge (ADB)
In this article I will talk about the Android Architecture and some frequently used terms such as ROM, Fastboot, Android Debug Bridge, Bootloader Unlocking, Rooting and Flashing. You may already know about some of these things or you may have read about it in many websites. But I am trying to give some more deeper information and examples so that you can understand it effectively.
Android Architecture
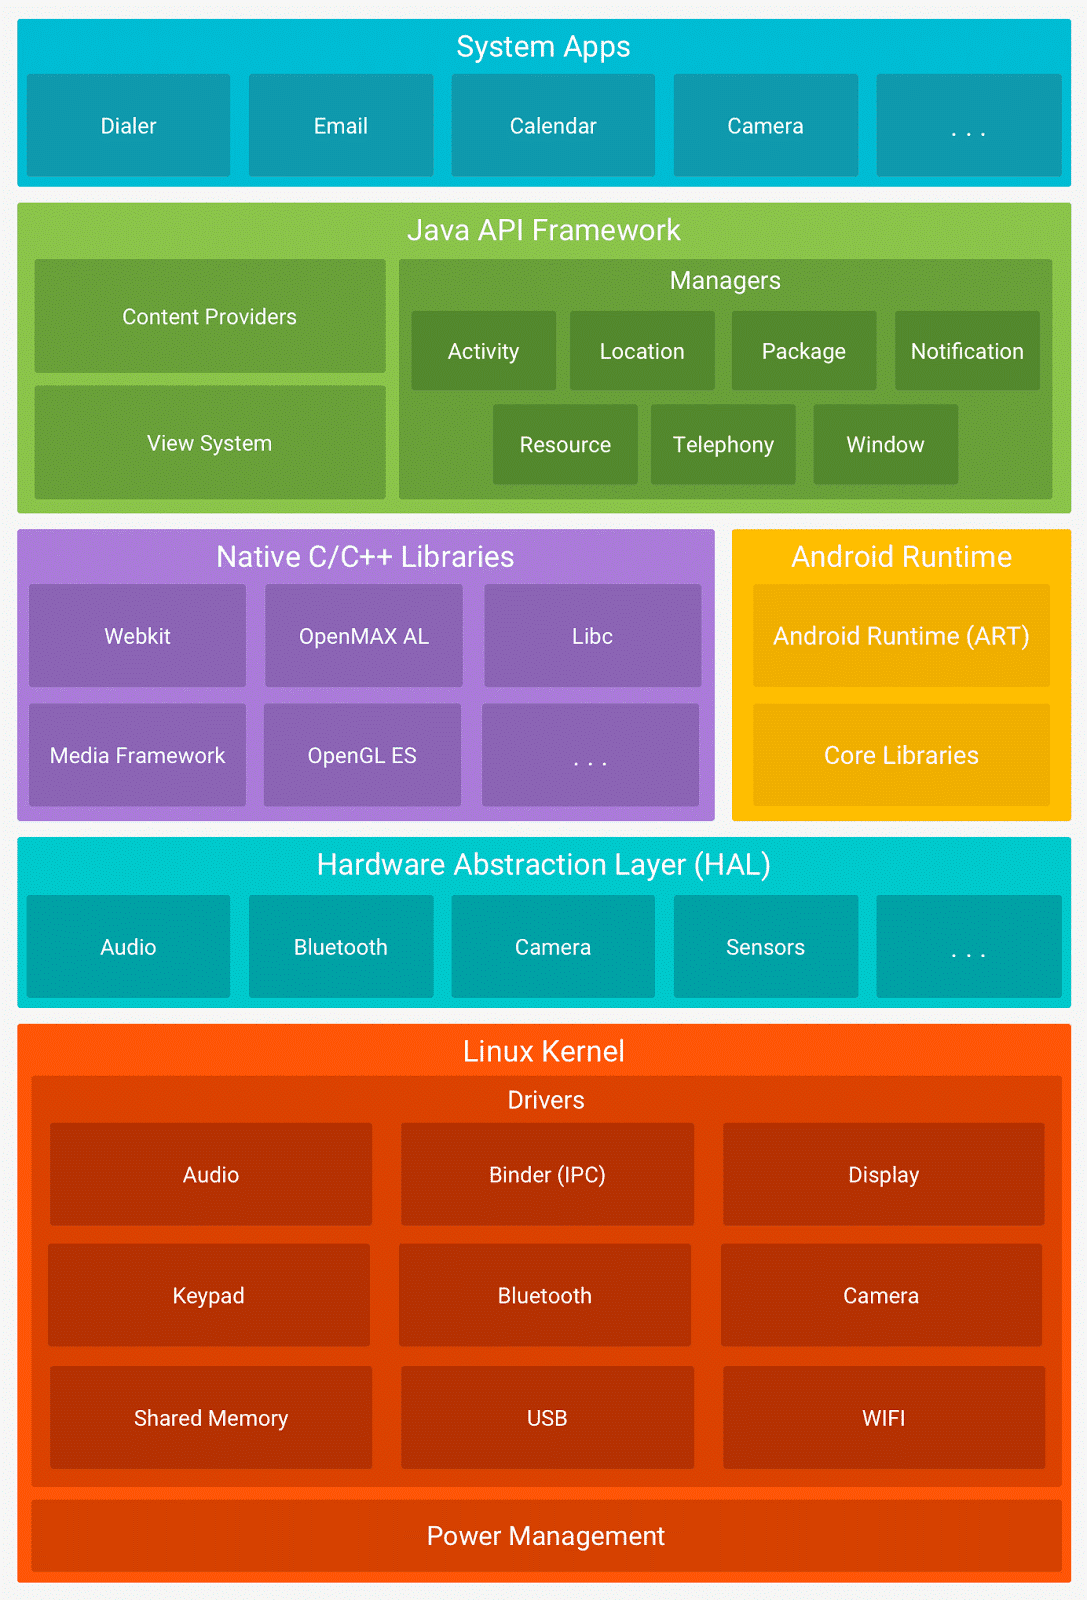
You already know that a lot of components are there inside Android Operating system. There should be some kind of arrangement for them for organizing the complex tasks without messing up. This arrangement is called the architecture. There are 4 levels in this arrangement (Here, I've combined HAL and Kernel as a single layer).
The components in the lowest level of android architecture are completely dependent on hardware, i.e. they can work with only that specific hardware. You can guess, it is the Kernel. The levels above it will ask the help of lowest level components for accessing hardware. As we move up in the levels the dependence to the hardware decreases, i.e. the same component works for any hardware of the same kind.
So let's start with the lowest level of android architecture, the Linux Kernel.
Kernel
Kernel contains the drivers for each and every hardware. The drivers are called as kernel modules and they have the extension ".ko". You can also develop your own kernel module using C and install it to the kernel using the "modprobe" Linux command. But you need root access to do this. Kernel also does the power management, process management and memory management. These are crucial for the smooth performance of the device.
There are some modules called governors. They are used to control the CPU speed. CPU inside the smartphone can run in different clock speeds which we specify in GHz and MHz. Clock speed written in the phone specifications is the maximum possible for that CPU. But it doesn't mean CPU will be running at that speed all the time. It will run at that clock speed only when that much amount work is need to be done. So governors watch the requirements and adjusts the speed of CPU accordingly.
If the CPU is running at maximum speed, then the battery will drain fast. And if it is running at low clock speed then battery usage will be low. The governor with name "Conservative" gives a stabilized battery life and performance. Another governor called "Performance" sets the CPU to maximum clock speed which will give super-fast performance but will drain the battery very quickly. This will also heat up the phone. Another governor called "Powersave" sets the clock speed to the lowest so the performance will be low but the battery will be amazingly high. The Battery Save Mode, which is automatically turned on when your battery level is below certain level, uses a similar governor.
A ROM will have many such governors and it switches between the governors at suitable times. But if you have root access then you can override this and change the governor manually. There are governors for different purposes too.
Above the kernel there is another small layer called Hardware Abstraction Layer (HAL). Every manufacturer designs the driver differently. So, to enable communication between the applications and the drivers it becomes difficult because there is no common language. As a result, applications need to be written differently for different hardwares. In order to solve all these problems HAL provides a common API to access the hardware to the rest of the operating system. That means HAL simplifies the access to the hardwares.
Native Libs and ART
This is the next layer above the Kernel and HAL. Native libraries are libraries for special purposes written in C. They will have the extension ".so". This is similar to the ".dll" files in Windows. There are lot of libraries. Some of them are,
SQLite - this library is used for creating and accessing databases. All android applications use SQLite as the database because it requires very low memory and it is easy to use in the apps. A file with extension ".db" is often used as SQLite database. WhatsApp uses this for storing the messages. If you check the WhatsApp's backup folder you can see many such SQLite database files.
WebKit - It is an open source browser engine. Many browsers such as Google Chrome, Safari, Opera (after version 12) etc. use the same engine with slight modifications. This is the same engine that powers many apps that use WebView technique for building apps. This list includes Facebook, Amazon, Flipkart etc.
SGL - Scalable Graphics Library provides the functionality for rendering 2D graphics. 2D games are rendered with the help of SGL.
Open GL ES - This library gives the functionality for rendering 3D graphics. High end graphics games are rendered using this native library. The new Android Nougat has Vulkan API along with Open GL to boost gaming experience.
Open SSL - Secured Socket Layer provides encryption functionality in networks. The websites which has https in front of their URLs uses the encryption provided by Open SSL library. This provides the cryptographic needs (encryption and decryption) of the other apps and Android system itself.
Media Framework - This library provides the functionality for playing, recoding, encoding, decoding media files such as Audio, Video, Picture etc. Almost all media players depend on this library for playing files. But some advanced media players such as MX Player also uses their own native libraries for supporting more file formats.
FreeType - This library does the bitmap and vector graphics rendering. That means this library handles all the font rendering processes.
Surface Manger, Window Manger - These libraries handle the user interface, the way they arranged and their creation, modification etc.
LibC - Last but not least LibC is the standard C library which gives library functions for C programs.
Android Run Time (ART) is also at the same level as Native Libraries. Android Run Time helps to run android apps. Till KitKat another technology named Dalvik was used for this purpose. In KitKat android allowed to switch between ART and Dalvik to taste the performance differences between two. Later from Lollipop onwards Dalvik is replaced by ART. Actually ART is an improved version of Dalvik.
The main difference is the addition of "Ahead of Time" (AOT) compilation in ART which improves speed (particularly app startup time) and reduces memory footprint. In Dalvik when you install an app it was simply extracted and copied to the installed apps folder. When you run that app Dalvik compiles the app's code to machine code to run in the phone. This is called "Just in Time" (JIT) compilation. So there was a little bit of delay while starting to run the apps.
But in ART this compilation is done at the time of installation itself. That means it will take some time to complete the installation but the app launch will happen in no time because compilation is already completed. Since ART compiles the app and stores it in the internal memory the size of the app after installation almost doubles (size of app + size of compiled parts of app). This reduced the internal memory dramatically.
When you do a software update or clear the cache from recovery all the compiled app code is removed so Android does the compilation process all over again. This is often shown as "Optimizing app x of xyz" after the update or restart. Makes sense isn't it?
But the new Android Nougat is smarter. The official website says it uses JIT technique of Dalvik along with the AOT technique of ART to reduce the installation time and the app launch time simultaneously. And the users of Nougat's public beta in Nexus devices claims that it definitely works. That is a good sign. But it is not clear yet how they implemented both technique together. May be it will be more clear when the source code is out.
Zygote is another important term which may be new to you. In biology Zygote is the fertilized egg which is formed by the combination of an egg cell and a sperm cell. This happens in Android too. There is Dalvik/ART virtual machine and the compiled code of the app. When the app launches a clone/fork of Dalvik/ART is forms and the app code is given to it to execute. We call this new instance as Zygote.
That means whenever an app launches android OS creates a new Zygote process and this provides the resources for the app. And Zygote gives the app the feeling that it has its own memory and resources and it is running alone in the device. But in reality it is being shared across many such processes. That is why it is called a Virtual Machine. If you take a closer look at the logs from your Android device, you can see the word Zygote frequently.
App Framework
This is the most important part in the architecture from the perspective of an app developer because this framework contains all the APIs and Java libraries we use while we develop an app. This application framework is fully coded in Java.
While we develop an app we use the term API level for denoting the version of the framework or the version of the android itself. That means for each android version there is a framework and there is a particular API level for it. For example, API level 21 is for Lollipop 5.0, 22 for Lollipop 5.1, 23 is Marshmallow and 24 is Nougat. Here is the complete list of API levels.
Applications
Applications are at the top level. That means they are least dependent on the hardware. The complexities of the hardware have reduced with the help of Kernel, HAL, Libraries and finally the Framework. So the app developer doesn't need to bother about the hardware stuff. But there are exceptions too.
Some apps are exclusively designed for some hardware. For example, the stock camera app that comes preinstalled with the phone is exclusively designed for that camera hardware in most cases. That is why the stock camera outperforms other third party apps.
So that's all about the architecture. There are more things which are part of this architecture. I will talk about it when I use it in the tutorial projects.
ROMs
ROMs are the operating system files that can be installed on a smartphone. There are official ROMs and custom ROMs. Official ROMs are obviously the softwares provided by the phone manufacturer. Custom ROM is the version of Android which will have more functionality and performance and stability (may be) compared to official ROMs and are built from the original Android source code or from the source codes of Cyanogen Mod/CAF/AOKP etc. There will be a lot of modifications and customizations available in custom ROMs.
ROM comes in 3 formats. One is the system image. It is the exact bit by bit copy of the internal memory of a phone. This is commonly used by manufacturers to provide the official ROMs. What they do is when they finish building the ROM which will be in their test device, they take clone of that phone's internal memory and release it as a ROM. It will be huge in size, typically 1-2 GB, because it will have unwanted parts of internal memory also. This type of ROM is flashed though Fastboot.
Another type is in ZIP format. This is very small in size, around 500 MB, because it contains only the required files. This zip file will also contain an update script which will first format the system partition, then copy the ROM files to system partition, set the user permissions and links to the different files. After each step the script updates the status so that user can see the progress while flashing. But in fastboot method there is no progress like this. But it is comparatively faster than ZIP method.
Third is ZIP file with only the changed files. So it will be very small, less than 100 MB. This is made for updating specific parts of the ROM, error fixes, minor updates such as marshmallow 6.0 to 6.0.1. In this type of update ZIP, it contains patch files. It is a format used by Linux operating systems to specify the changed part of a file with respect to the original file. So it will very small. While updating the script will execute these patches and modify the system files.
Bootloader Unlocking
Every smartphone manufacturer applies some kind of protection to the softwares bundled with the phone in order to prevent virus or malware attacks, unauthorized software changes etc. This is for security purposes. The primary and the most important protection is the bootloader lock or OEM lock. This exists in bootloader so that user will be able to flash only the original system images from the manufacturer to the phone's partitions.
How phone identifies that the system image is original and is not a modified/custom one? Digital Signatures. Every manufacturer will have a digital certificate which is top secret and they will not share to the public (recently Microsoft's certificates where leaked allowing users to flash Android into a Windows Phone device). When they release an update of the software they sign that files with their certificate. Phones can check this signature and identify whether it is official one or not. By default, phone will not allow flashing unofficial images. This is called the bootloader locking.
To override this, we will unlock the bootloader using Fastboot. Obviously this is called bootloader unlocking. By doing this you will lose the warranty. This is because if the phone damages while flashing or modifying software in a wrong way it is completely your fault. Manufacturers provide warranty only if the cause of damage is because of their bad engineering.
But there is an option to relock the bootloader too! You can do this with fastboot. But you will never get the warranty back. How manufacturer finds the phone have unlocked? Simple. There is a hardware fuse inside smartphones. Samsung calls it KNOX Warranty Bit.
When you unlock the bootloader the hardware fuse burns. Yes, it burns. But you cannot see it. It is a one-way process, no rolling back, even if you relock the bootloader from fastboot. When you ask for warranty the service center checks whether the fuse has burned or not and rejects warranty accordingly. Some manufacturers such as Motorola ask the user to register in their website to get the unlock code, so that they also have a database of phones with and without warranty.
Rooting
We saw the protection in the bootloader. Similarly, Android OS also have many protection techniques applied to it. One technique is making the system partition Read Only. If this is active nobody can alter the system files while operating system is running. This is configured in file system table (fstab) it is a part of system. The only way to modify the system file is through Recovery. Because in Recovery all partitions mount in Read Write mode.
Again this is possible only through a custom recovery. Official/stock recovery will not allow this because the manufacturer wont like modifications to their software. So what we do is unlock the bootloader and then flash a custom recovery then boot into recovery and modify system files. Once we got such a write access, the first thing we must do is to modify the fstab and make the system mount in Read Write mode. So when we boot to android next time the system mounts in Read Write mode.
Another protection mechanism is setting the user access permissions to the files. From user's perspective, till KitKat Android was a single user operating system. And from Lollipop onwards Android became multi user. But internally Linux supports multiple users and by default there are two.
One obviously, the person who uses the smartphone. "root" (also known as Super User) is the other one. root is imaginary but it has all the privileges to perform anything in the operating system. All the system files are accessible only to this root user. That means the person who bought the phone doesn't really own all part of it.
Fortunately, Linux provides another functionality called "substitute user" or in short "su". You have seen this word "su" many times, haven't you? It simply helps the current logged in user to do some task on behalf of another user. That means normal user can perform tasks as another user, for example root, by switching to that user temporarily. Developers expand su in different ways. Some say su is "switch user" and some say as "super user" because most of the time we use su for switching to super user or the root.
But unfortunately manufacturers will not implement this in their softwares. You know the reason. So the only way is to build su from its source code and inject it into the operating system. Luckily a guy named "Jorrit Chainfire Jongma" best known under the code name "chainfire" has done this job for us. He provides a zip file which is just like an update/patch ROM. Its name is SuperSU Binary. It contains a script that will inject su into the system and change the fstab to make the system writable.
His script also does some tweaks to make the root access smooth and secure. For example, his su binary will not allow all the apps to use root access whenever they need it. Instead su will ask your permission to give root permission to app. This gives user the control to everything. Thanks to chainfire, he did a great job. He also provides an app called SuperSU which is available in play store to manage the root access of apps easily.
Rooting is the collective name of all processes including flashing custom recovery, injecting su binary and changing system access to read write mode.
Keep in mind that what I explained is general concepts. There are small changes in every smartphones depending on how the manufacturer protects their software.
Flashing
Flashing is the process of installing a ROM or writing system image to a partition. If you have unlocked bootloader you can install any system images to your phone. But almost all the custom ROMs comes as zip because it is smaller. So to flash a third party zip file you will need a custom recovery like CWM or TWRP. Since the bootloader is in disabled state you can do that using fastboot. So if you have unlocked bootloader then flash a custom recovery and you are ready to flash your favorite ROM.
That means you don't necessarily need root access to flash a ROM. Root access is only for getting more privileges in the existing ROM, most probably the stock ROM. By default su binary and SuperSU app exist in almost all custom ROMs. So you don't need to do the rooting process in a custom ROM.
There are two ways to do flashing. One is Clean Flash. This is the most recommended and safe method. In Clean Flash before flashing the zip file user does a factory reset or wipes the data, cache and Dalvik cache partitions. This is to isolate the system partition and clean all the dependent data and cache before a rewrite.
On the other hand, in Dirty Flash user will not do these wiping processes. Instead user flashes zip file directly on top of the existing system partition without cleaning data and cache. This is very risky because a lot of linked contents may exist inside data and cache partitions. And it may cause some conflicts after flashing. Do this only if you know very well that the ROM in the zip file and the existing ROM in the phone are fully compatible. Otherwise it will cause boot loops or may soft brick the phone.
Bootloop, Soft Brick, Hard Brick
These are the three type of troubles your phone can get into while unlocking, rooting and flashing.
Bootloop occurs when the Android operating system is not able to complete the booting process. There may be some errors or compatibility issues in the system files or in the kernel. So when an error occurs and Android is not able to resolve it by itself , the device restarts. This happens over and over again. Dirty flashing, improper modification of the system files, incompatible ROMs, kernel etc. are the most common reasons for bootloop.
Soft brick is the situation when the phone is not even able to start booting. This is mainly due to the incompatible or unstable kernel. Problems in Android operating system may also cause soft bricks. Phone freezes at the boot logo when soft brick occurs.
Hard Brick is when the phone damages and there is no any possible recovery options. Clean flashing the official ROM or any known working ROMs can solve bootloop and Soft Brick. But a user cannot fix a Hard Brick easily. In some situations, repairing the bootloader by directly programming into the chipset can fix Hard Bricks. But such facility is available only to certain phones.
Fastboot
In the previous chapter I talked about the Bootloader and its working. Fastboot is a small utility that comes along with the Android Software Development Kit (SDK). It helps to communicate with the bootloader when phone is showing the bootloader menu.
Phones manufactured by some companies uses modified bootloader protocols. For example, Samsung calls the bootloader mode as Download mode or Odin mode. The software called Odin is alternative to Fastboot. But in my personal opinion Fastboot is better. Samsung made it a crap. Two most important Fastboot commands which we will need to use frequently are,
fastboot oem command for unlocking and relocking the bootloader.
fastboot flash command for flashing image files to different partitions like recovery, boot, system etc.
Android Debug Bridge (ADB)
ADB is another command line tool that comes with Android SDK just like Fastboot. But the difference is Fastboot communicates with Bootloader but ADB communicates with Recovery or Android OS. So there are differences in functionality too. You need to turn on USB Debugging in the Developer Options in the phone settings to access the phone using ADB. ADB can do lot of things compared to Fastboot. Some of them are,
Access android device in shell mode and run Linux commands in it. adb shell command will open such a shell prompt.
Copy files between the computer and phone. adb push command sends file to phone and adb pull command copies files from phone to computer.
Reboot to recovery or bootloader. adb reboot recovery will restart the device and boot to recovery. adb reboot-bootloader will restart and show the bootloader menu. From this point you can connect to the phone using the Fastboot utility.
Install or uninstall apps using computer. adb install command will install the APK, adb install -r will replace the old app with new APK, adb uninstall will uninstall the app.
Backup or Restore Apps. adb backup command will back up the app with its data (data backup only for very few supported apps). adb restore command will restore app back up.
Side load ROM zips. This is possible only if you are using ADB after booting Recovery, not the Android OS. adb sideload command will upload the ROM zip from computer and recovery will flash the phone with it. That means you don't need to copy the zip file to SD card to flash it.
So that's it. I hope you got something knew about Android from this article.
If you found this article useful then don't forget to share it. For updates you can follow me in social networks or subscribe to this blog.
To be continued..