I built a custom PC for $1400. And it was funtastic!
■ Asus Prime B360M-A Motherboard
■ Intel i7 8700K, 6/12, 3.7/4.7GHz
■ Zotac GTX 1060 6GB GDDR5 AMP Edition
■ Samsung 970 EVO 250GB M.2 NVMe SSD
■ Corsair Vengeance 16GB DDR4 3000MHz
■ BCM943602CS WiFi 802.11ac Bluetooth 4.1 Card
■ Corsair H55 Liquid Cooler, Corsair VS650 SMPS 650W, Corsair SPEC 1 Mid Tower Cabinet, APC 1.1KVA 230V Back-UPS
■ Assembly
Things are whole lotta better now. Everything is silky smooth. Before that, I was getting trained by my Dell Inspiron 3521 to be more patient in life. Don’t get me wrong. It was fast; when I bought it. AFAIK it was the best laptop anyone had in my college. I named it “Turbo”. I like naming stuff because that makes me give more value and care to it. But after 5 years in service, it really started to slow down. It became slow enough that, if I see a loading spinner, it couldn’t stop me from thinking “You know what, I have a better way to do this. Let me cancel this and do that.” Sometimes this happens multiple times and I forget what I was doing in the first place.
Then MacBook Pro happened. I got one for my work because I had to build apps for iOS. Holy mother of god that was insane! It was a beast packed in a aluminium box. I loved MacOS as well. It has the coolest spinner ever. Now if there is a spinner, which is a kind of rare event, I will just stare at it and enjoy those rainbow colors. That was the most expensive electronic device I have ever touched in my life. As great power comes great responsibility, I became scared to keep it in the place where I stayed as paying guest. It even became one of the reasons why I moved to an independent flat. Also, for the record, I named my MBP as “Turbo” and renamed Dell as “Flash” (I like animated films by the way).
Soon MBP became my favorite as I almost stopped using my laptop. I started using it even for my side projects which is something I don’t like to do because I like to keep my work-related stuff separate from my experiments. I have plans to do some machine learning projects which is not really a pleasing experience in a 5-year-old AMD GPU. My laptop’s hardware became so outdated to a point, it is just not capable of running all the hot new tech stuff I wanted to experiment with. I also wanted to play my favorite game, Counter Strike Global Offensive, in which I happen to be an above average player. All these fuelled my desire to set up my own custom PC. So I did some serious research and figured out that the spec I wanted will be really expensive and I can’t afford it. And I almost dropped that idea.
Then after a couple of months, bonus happened. I got my first yearly bonus from my company and that refuelled the plans. Soon I discussed with my parents who are handling the wealth management for me and they said yes. Hell yeah! I had a budget of ₹1 Lakh (that is a lot of money). So I carefully picked parts in a way that it will give the optimal performance and features I need and will be upgradable in future at minimum expense. I also wanted to install MacOS in it (Answer for “why” will be a bit long. I will talk about it later in another post). So the selection of the hardware was more specific. Without further ado here are the things I bought and why.
Asus Prime B360M-A Motherboard

I absolutely love this motherboard. It has so many features at a reasonable price. One might think H370 chipset will be a better choice because it has overclocking support and is superior to B360. It is true and of course it can take the hardware I have to a next level. But I chose this because it had everything I needed without compromising performance. Also this is the cheapest component in the build that will actually need an upgrade. So in future if I want to overclock my processor I can upgrade to H370 or Z370 without wasting so much money behind.
Speaking of the features, it has two NVMe M2 slots. I added my Samsung EVO SSD in one of them. NVMe uses PCIe lanes for data transfer just like graphics cards. So they are really fast and the bottleneck becomes the speed of the SSD not the bus used for transfer. Theoretically it can transfer upto 4GB per second. But I guess only Intel Optane SSDs are capable of that much speed.
It also has 7.1 audio output with one digital S/PDIF port. I loved it because: first, I’m an audiophile and second, I already have a 5.1 speaker setup. So I used 3 ports on the back for my speakers and the front port for my headphones. Perfect!
It has Gigabit Ethernet. This was also important to me because I have a Raspberry Pi 3B+ which also has Gigabit ethernet and I am planning use that as my home router/server. So a high bandwidth connectivity between them will be really cool.
Honorable mentions will include two USB 3.1 Gen 2 ports, one USB-C port, four dual channel DDR4 slots with 64GB capacity, fancy orange lights and other usual stuff.
Intel i7 8700K, 6/12, 3.7/4.7GHz
Best pick in 8th gen processors if you don’t want to blow your pocket with i9. Absolute beast in terms of performance. 6 cores, 12 threads, 3.7GHz base with turbo upto 4.7GHz. The “K” in the name means it can be overclocked to 5GHz. But for that I will need a Z370 chipset. As I said before there is always a room for upgrade, but just not now.
Zotac GTX 1060 6GB GDDR5 AMP Edition
Initially my plan was to use the Intel UHD graphics built-in to the processor because I thought that will be enough for my gaming stuff and other experiments. But unfortunately it had some weird port issues in MacOS when I enable graphics acceleration.
So I decided to buy NVIDIA 1060 and dual boot Windows for gaming. It has 6GB RAM which is insane to me because that is more than enough for all AAA titles. It has really great computing power as well. I hope I can do some deep learning projects with it. Hey Tensorflow, buckle up!
Samsung 970 EVO 250GB M.2 NVMe SSD

As I mentioned earlier my motherboard has two M.2 ports where I can connect NVMe SSDs. It also supports Intel Optane Memory which is even faster but it is super expensive. So I went for the best SSD in town, Samsung 970 EVO. As far as I know this is the best one you can buy at the moment. It is really fast. But not as fast as Apple’s iMac SSDs. But you know, they are soldered to the board and you can’t buy it.
I benchmarked it from MacOS. Here is the result:
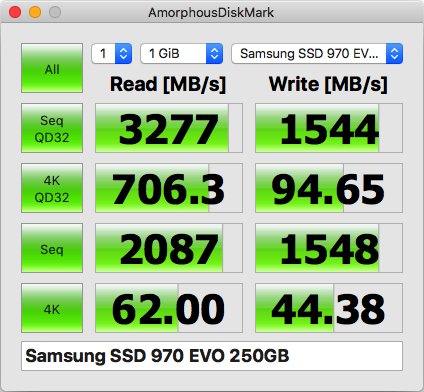
As the name says it is an NVMe SSD, not SATA. This SSD uses four PCI 3.0 lanes for the data transfer. NVMe(Non-Volatile Memory express) is a standard for storage devices connected via PCIe. And M.2 is the form factor.
I bought 250GB version because from the experience of using MBP with same capacity I found out that this is more than enough to keep the stuff which need to have fast access. Everything else will be in my external hard disks. Did I mention that my motherboard has USB 3.0 Gen 2 ports? Also, I scavenged a 10 year old 160GB SATA hard disk from my first PC for dual booting Windows.
Corsair Vengeance 16GB DDR4 3000MHz
When I had to choose a RAM my first decision to make was whether to buy two 8GB sticks or single 16GB stick. Since my motherboard has dual channel slots theoretically with two 8GB sticks I will get better performance because of the parallelism. But it is not a visible difference except you will get couple of extra FPS in a few games. Also, I felt like wasting an extra slot. So I decided to stick with single stick.
This RAM can actually run at 3000MHz but Intel 8th gen processors support only upto 2666MHz safely. So by default it will be locked to 2666MHz. But if you mess around XMP profile in BIOS you can change it. But this is okay for me. Let’s keep it simple.
BCM943602CS WiFi 802.11ac Bluetooth 4.1 Card

This choice was made after a lot of research. As I mentioned earlier I wanted to install MacOS in this build. But the support for WiFi & Bluetooth cards for MacOS is very poor. So I had to choose one that is supported in it. And I found BCM943602CS in many forums as a compatible model. I really liked it because it had 5GHz WiFi which can work best with my Pi router.
To benchmark I created a WiFi hotspot on band 40 (5GHz) on this system and connected my MBP to it. Here is the result:
$ iperf3 -c 192.168.2.1
Connecting to host 192.168.2.1, port 5201
[ 5] local 192.168.2.3 port 55259 connected to 192.168.2.1 port 5201
[ ID] Interval Transfer Bitrate
[ 5] 0.00-1.00 sec 29.7 MBytes 248 Mbits/sec
[ 5] 1.00-2.00 sec 33.0 MBytes 278 Mbits/sec
[ 5] 2.00-3.00 sec 33.2 MBytes 277 Mbits/sec
[ 5] 3.00-4.00 sec 35.5 MBytes 299 Mbits/sec
[ 5] 4.00-5.00 sec 37.7 MBytes 316 Mbits/sec
[ 5] 5.00-6.00 sec 38.4 MBytes 323 Mbits/sec
[ 5] 6.00-7.00 sec 39.6 MBytes 332 Mbits/sec
[ 5] 7.00-8.00 sec 37.0 MBytes 310 Mbits/sec
[ 5] 8.00-9.00 sec 35.3 MBytes 297 Mbits/sec
[ 5] 9.00-10.00 sec 8.32 MBytes 69.5 Mbits/sec

---

[ ID] Interval Transfer Bitrate
[ 5] 0.00-10.00 sec 328 MBytes 275 Mbits/sec sender
[ 5] 0.00-10.24 sec 327 MBytes 268 Mbits/sec receiver

iperf Done.
I got a top speed of 332 Mbits/sec. Sweet!
BCM943602CS was made by Broadcom specifically for Apple devices. So I was a bit worried about the Windows support. But I had hope because MacOS’ Bootcamp can install and setup Windows and drivers for any Macs. That means the Bootcamp setup must have drivers for that model and I can extract it with a bit of digging. Fortunately someone had already done this and it was available as a zip.
I bought it from AliExpress for $20 including its PCIe adapter and 3 antennas. By far this was the easiest hardware installation while setting up MacOS. I just plugged it in one of the PCIe x1 port and there you have your WiFi and Bluetooth. Let’s go baby!
Corsair H55 Liquid Cooler, Corsair VS650 SMPS 650W, Corsair SPEC 1 Mid Tower Cabinet, APC 1.1KVA 230V Back-UPS
I just realised this build has 4 Corsair products in it. To be honest they are really good in terms of build quality. But at the same time there are some stupid mistakes too. For example, the installation instructions of liquid cooler had different labels compared to the packets in the box. Also the cabinet has one fan screw positioned right above the side panel edge that covers the backside. That was quite annoying because every time I have to open the cabinet I have to loose that screw.

Everything else is fine. The liquid cooler is cool. It is dead silent. For a second I thought it was not working. The fan inside the cabinet is also pretty noiseless. The UPS I bought is rated at 1.1KVA which is more than enough for casual usage. But in my area there are frequent power drops. So a bit higher capacity comes handy. It can hold the entire system for 30–45 mins which is more than enough to finish a battle royale game.
Assembly
As a precaution and to refresh all the stuff I know, I watched a bunch of Youtube videos and read couple of articles. Last time I did an assembly was 10 years ago. Surprisingly there is no much difference in the process. Only the addition of liquid cooling and NVMe SSD were the major differences.
Most of the parts I ordered got delivered in a day. UPS and cabinet took few more days. Probably because they are heavy. I was really happy, excited and nervous looking at the fresh new hot cool tech. But soon I started losing my patience because I wanted to assemble everything and try it out but the cabinet is still on the way. And I didn’t want to make any damage to those parts. I have never seen my brain so divided. Later I remembered about the 48 hours immediate replacement policy of the website I ordered from. That was the call. I decided to connect and test everything out so that if there is any faulty piece I will get a quick replacement.
I unpacked everything, placed on my table and started connecting one by one onto the motherboard. It was like legos except they are expensive. Liquid cooler was the difficult piece to setup because of the incorrect labelling of the components. I had to watch their videos to figure out the correct way to do it. Another tricky part was the switch to power on the system. Since I didn’t had the cabinet I had to connect couple of jumper wires on the motherboard headers and short it. Luckily everything went smooth. I ensured everything is properly detected and functioning by running a live Zorin OS from a USB drive.

When I finally got the cabinet I just unplugged everything except cooler, because it had thermal paste, from the motherboard and transferred it to the cabinet. It was easier than I expected. Later I installed MacOS which was really really hard. That deserves another post. I also dual booted Windows. As I mentioned in the beginning things are whole lotta better now.
Anyway I had a lot of fun building this system. Learned a lot of things along the way. If you are thinking of doing the same go ahead, do some research, do the math, get the best parts for your budget and just build it. Nothing is more fun than building something!